

Google Sheets Sending Automatic Mail
Google Sheets, Google Form and Google Apps Script


There are bunch of tutorial videos about how to send mail using Google Sheets in YouTube. I’ve decided to create a documentation (or how-to tutorial) about it. (Search query on this subject: https://www.youtube.com/results?search_query=google+sheets+send+email+apps+script)
I believe shared links in the instant messaging becomes lost in the conversation clutter so I use this process to mail some friends occasionally on a specific time of day.
Step 1: Creating Spreadsheet
Create a free Google account and go to Sheets main page: https://docs.google.com/spreadsheets/u/0/.
Start a new spreadsheet (Blank Spreadsheet)

Rename the spreadsheet as Automatic Mail Process.
Create a new sheet as Lookups.
Create 2 columns with Names and Emails headers.
Populate Names column with your friends names. (They should be unique entries)
Populate Emails column with your friends email corresponding with Names row. (sample table below)


Step 2: Creating Form
Create a Google Form affiliated with this spreadsheet.(Under the Tools menu, Create a new form)
Form opens in a new tab and a new sheets as “Form Responses 1” automatically created in the spreadsheet. Rename this sheet as Form Responses. This is the sheet where your form responses (inputs) will be transferred.
Switch to form.
You will need 3 columns: Recipient, Subject and Mail Body.
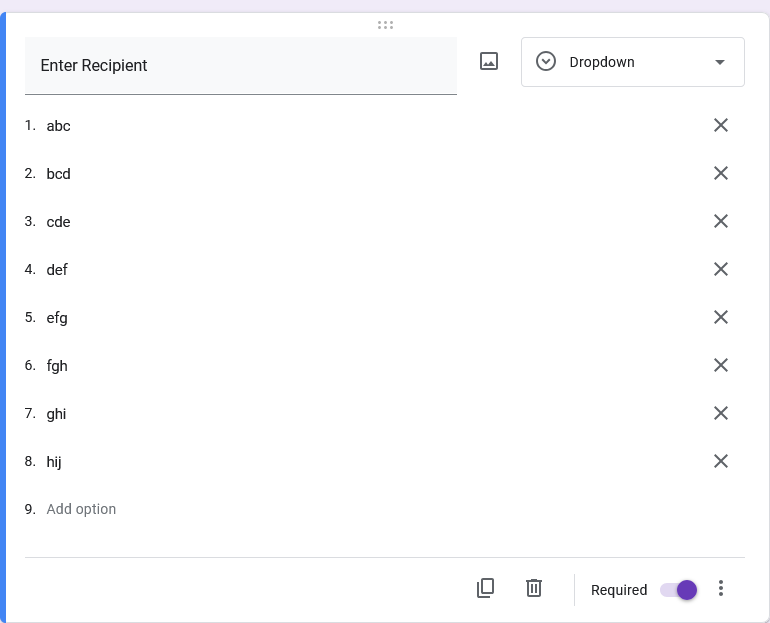
Name your first input field as “ Enter Recipient” on the Questions tab and select the data type option as Dropdown.
Write your recipients in the option section as shown in the Lookups sheet Names column. (Later names and emails will be matched).
Actually, you only need email address to send mail but when we share the forms links with people it becomes publicly accessible unless it is work or school account. I came to conclusion that this is default behavior for Google Forms. Therefore, I use names instead of actual email addresses (privacy concerns). You can also use aliases instead of names as long as they match with Names column in the Lookups sheet.
Make this field “Required”.

Add another question and name it as “Enter Subject”.
Select “Short answer” as data type.
Make this field “Required”.

Add another question and name it as “Mail Body”
Select “Paragraph” as data type.
Make this field “Required”

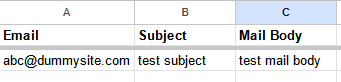
Now, our form is ready to enter value. You can see corresponding of these field in the spreadsheet (Form Responses sheet) with an additional Timestamp column.

Preview the form and enter a dummy value and see the result is shown in the spreadsheet

Timestamp column is informative purposes and Google Forms/Sheets add this column automatically.


Step 3: Configuring Spreadsheet and Scripts
Switch back to spreadsheet
Open Apps Script (Menu → Extensions → Apps Script)
This will open a Untitled project. You can rename whatever you want. I renamed it as “Automatic Mail Script”
At this stage, you need transfer the collected values. From Form Responses sheet to To_Be_Sent sheet.
The code below transfer these values if there are any data to transfer. Remember we are using names or alias; while transferring these values, it matches the corresponding email address. Script Editor opens with a blank code page, clear the existing code and pastethe below code and rename this script file in the Editor menu on the left navigation pane as “TransferData”.
function transferNewEntries() {
  // Defining sheet variables
  var sourceSheet = SpreadsheetApp.getActiveSpreadsheet().getSheetByName("Form Responses");
  var lookupSheet = SpreadsheetApp.getActiveSpreadsheet().getSheetByName("Lookups");
  var targetSheet = SpreadsheetApp.getActiveSpreadsheet().getSheetByName("To_Be_Sent");

  // Finding last rows
  var lastRowForm = findLastRow("Form Responses", "A"); // Finding the last row on Column A in the Form Responses sheet
  var lastRowLookups = findLastRow("Lookups", "A"); // Finding the last row on Column A in the Lookups sheet

  // Starting row
  var startRow = 2;

  // If there are any values, start the transfer process
  if (lastRowForm >1) {
    // Looping through starting row which is 2 until last row
    for (var i = startRow; i <= lastRowForm; i++){
      var rowData = sourceSheet.getRange(i, 2, 1, 3).getValues(); // Retrieve the values
      var searchName = rowData[0][0]; // This is the name or alias you defined.

       // Searching your name or alias in the Lookups sheet.
       for (var j = 2; j <= lastRowLookups; j++) {
        var lookupRow = lookupSheet.getRange(j, 1, 1, 2).getValues();
        var lookupKey = lookupRow[0][0];

        // When the searched value was found email, subject and mail body variables are created
        if (searchName == lookupKey) {
          var emailToBeSent = lookupRow[0][1];
          var subjectToBeSent = rowData[0][1];
          var bodyToBeSent = rowData[0][2];

          // Create a 2D array containing the values
          var valuesToBeSent = [[emailToBeSent, subjectToBeSent, bodyToBeSent]];

          // Find the last row with data in the target sheet
          var lastRowToBeSent = findLastRow("To_Be_Sent", "A");

          // Append new record below existing records
          targetSheet.getRange(lastRowToBeSent + 1, 1, 1, 3).setValues(valuesToBeSent);

          // When the searched value was found, it stops searching because there is no need (therefore every name or alias should be unique)
          break;
        }
      }
    }
    // Clears the value on the source sheet (Form Responses)
    sourceSheet.getRange(2, 1, lastRowForm, 4).clearContent();
  }
  }
When you run the script for pre-existing values, they should be transferred to To_Be_Sent sheet with their email addresses.

Small caveat: After transferring the values to To_Be_Sent sheet, it clears the data in the Form Responses sheet. Clearing content in the cell is not the same as deleting those cells or deleting rows. When you clear content (or del button on the keyboard) Google Sheets behaves like there is data in that cell, therefore next form responses skips these cells and starts from next row. It leaves some blank rows in your Form Responses sheet which is fine in my opinion because when the code executes it skip blank cells and transfer only non-blank rows. (You can delete those rows occasionally or I can update the code in the future taking into account this blank rows)
Finding the last row on predefined column and sheet requires another function. You can access it from here:
Step 4: Sending the Email
Create a new sheet as “SENT” with these columns starting from Column A: Email, Subject, Mail Body, Sent Date Time.

Create a new script called “SentData”
Paste the code below in this page.
var ss = SpreadsheetApp.getActiveSpreadsheet()
const SENT_SHEET = ss.getSheetByName("SENT") // You can skip or comment this line if you don't want to log what is sent and when it was sent

function sendMail(){
  var sheet = SpreadsheetApp.getActive().getSheetByName("To_Be_Sent");
  sheet.activate();

  var emailData = ss.getRange("A2:C2").getValues();
  var check_value = ss.getRange("A2").getValue();

  if (check_value !=""){
    // No data no action
    MailApp.sendEmail({
      to: emailData[0][0],
      subject: emailData[0][1],
      body: emailData[0][2]
    });


    SENT_SHEET.appendRow([emailData[0][0], emailData[0][1], emailData[0][2], getDate()]); // You can skip or comment this line if you don't want to log what is sent and when it was sent
    sheet.deleteRow(2);
  }
}
This code reads the first row in the first row of To_Be_Sent sheet if this row contains any value and sends it as email to that person.
Sending the email is executed by MailApp.sendEmail. (Details are at the end of the post) You only need to know how to give proper inputs to this function and those are basically email, subject and mail body. Remember the sent mail is affiliated with your Google account and after sending the mail you can see it on your Sent Folder in the Gmail.
As I’ve stated in the code you can skip logging/archiving what you sent by simply commenting these lines.
Code sends only first, that was my preference. If I have 10 records waiting to be sent to same person, I don’t want to overwhelm the recipient by sending all of them simultaneously.

Step 5: Scheduling
We don’t want to send these mail manually. We only need to fill the required field in the form. The rest of them are automatic. Except if you need to add another person, it should be added both in the form and Lookups sheet with matching Names or Aliases.
Google Apps Script has a feature to trigger functions. By using this whole process can be automated. One trigger should be used to transfer form inputs to To_Be_Sent sheet. And other trigger should be used to send mail. Of course first one should execute before the second one.
On the left navigation pane, select “Triggers”.
Select “Add Trigger” (On the right bottom corner)
The popup screen shows you recorded functions. You can select when they want to be executed.
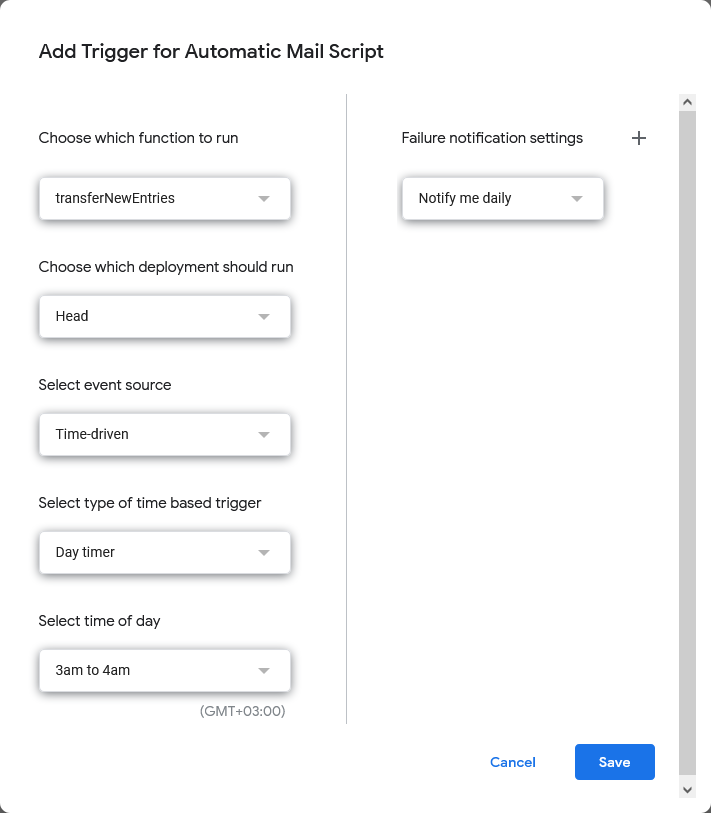
Select this options:
Choose which function to run: “transferNewEntries”
Choose which deployment should run: “Head”
Select event source: “Time-driven”
Select type of time based trigger: “Day timer”
Select time of day: “3am to 4am” (It is a good option to transfer all data while everyone is sleeping)
Failure notification settings: “Notify me daily”

Click “Save”.
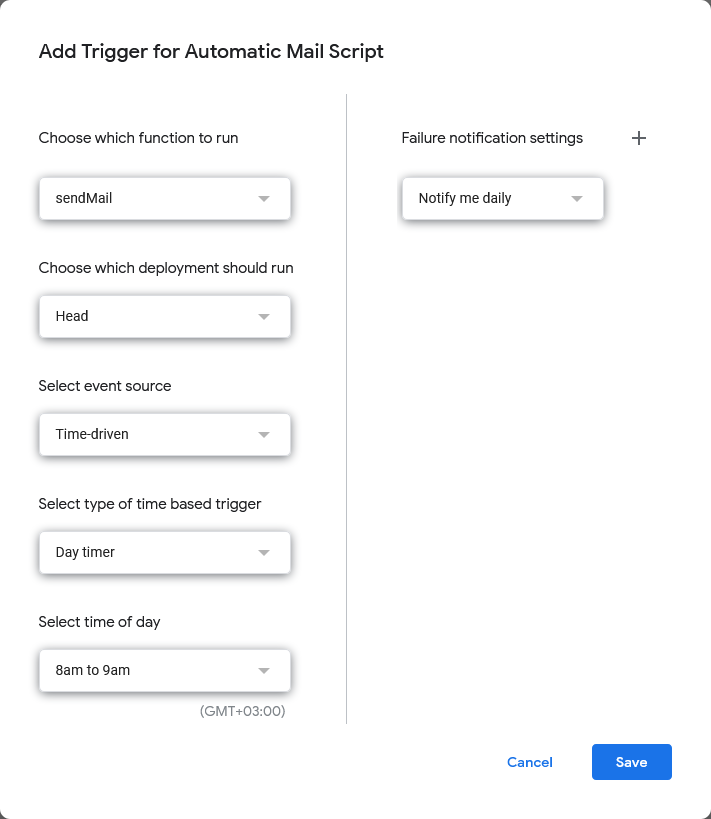
Repeat the same process for “sendMail” function. Except select different time of day after the first trigger executed. I’ve selected “8am to 9am”.
Saved triggers:

That’s it. All are done.


Step 6: Summary
The contents you saved will be transferred from “Form Responses” sheet to “To_Be_Sent” between 3am to 4am. And couples of hours later (between 8am to 9 am) it will be sent to recipient.Then the sent mail will be transferred to “SENT” sheet.
You only need to use the form now on (and occasionally add new user if necessary).
Step 7: Additional Information
Google send mail has a daily quota using this method and it is 100. You can learn the remaining quota with this code (If you already sent a test mail, the code below returns 99):
// Remaining sent mail quota
function remainingQuota(){
  var emailQuotaRemaining = MailApp.getRemainingDailyQuota();
  Logger.log("Remaining email quota: " + emailQuotaRemaining);
}
If you want to log when you have sent while using “sendMail” function, you need an additional
getDatefunction (you can change the date format at your convenience):// Get the current date time function getDate(){ const now = new Date(); //const timeZone = AdsApp.currentAccount().getTimeZone(); //spreadsheet.getRange('A1').setValue(now); var date = Utilities.formatDate(now, "GMT+03:00", "dd.MM.yyyy HH:mm:ss"); //Logger.log(date) return date }
Step 8: Notes and References
Scripts, triggers need explicit permission to execute. When they pop on the screen you should accept it to able to execute these scripts. (If you want of course, it is not mandatory)
Triggers in Google Sheets: https://spreadsheet.dev/triggers-in-google-sheets
Gmail sending limits in Google Workspace: https://support.google.com/a/answer/166852
Class MailApp: https://developers.google.com/apps-script/reference/mail/mail-app#sendEmail(String,String,String,Object)